Setting Up Drives In Windows 11: A Comprehensive Guide
Setting Up Drives in Windows 11: A Comprehensive Guide
Related Articles: Setting Up Drives in Windows 11: A Comprehensive Guide
Introduction
In this auspicious occasion, we are delighted to delve into the intriguing topic related to Setting Up Drives in Windows 11: A Comprehensive Guide. Let’s weave interesting information and offer fresh perspectives to the readers.
Table of Content
Setting Up Drives in Windows 11: A Comprehensive Guide
This comprehensive guide provides a detailed explanation of how to set up drives in Windows 11, encompassing various scenarios and addressing common challenges. Understanding drive management is essential for efficient data storage, organization, and access within your Windows 11 environment.
Understanding Drive Management in Windows 11
Drive management refers to the process of organizing and configuring storage devices, such as hard disk drives (HDDs), solid-state drives (SSDs), and external drives, within your Windows 11 operating system. This includes tasks like:
- Partitioning: Dividing a physical drive into multiple logical partitions, each functioning as a separate drive with its own file system.
- Formatting: Initializing a drive with a specific file system, enabling Windows to recognize and access the drive’s contents.
- Assigning Drive Letters: Defining unique identifiers (letters) for each drive, making them easily identifiable within Windows Explorer.
- Drive Properties: Modifying drive settings, such as file sharing permissions, security attributes, and drive label names.
Common Drive Setup Scenarios in Windows 11
1. Installing a New Hard Drive or SSD
- Initial Setup: When installing a new drive, Windows 11 typically automatically detects it during the setup process. The drive may be formatted and partitioned automatically, or you can customize these settings during installation.
- Manual Configuration: If the drive is not recognized automatically, you can manually configure it using the Disk Management utility. This involves partitioning the drive, formatting it with a suitable file system, and assigning a drive letter.
2. Connecting an External Drive
- Plug and Play: Most external drives are "plug and play," meaning they are automatically recognized and mounted by Windows 11 when connected via USB or other interfaces.
- Drive Recognition: If the drive is not recognized, check the connection, ensure the drive is powered correctly, and verify the USB port’s functionality.
- Formatting: If the external drive is unformatted or uses an incompatible file system, you can format it within Windows 11 to make it compatible with your system.
3. Managing Existing Drives
- Disk Management Utility: This built-in tool provides a comprehensive overview of your drives, allowing you to create, delete, resize, and format partitions, change drive letters, and manage other drive-related settings.
- Drive Properties: Accessing the properties of a drive allows you to modify its settings, such as file sharing permissions, security attributes, and drive label names.
Setting Up Drives in Windows 11: A Step-by-Step Guide
1. Accessing Disk Management
- Method 1: Search Bar: Type "Disk Management" in the Windows search bar and select the matching result.
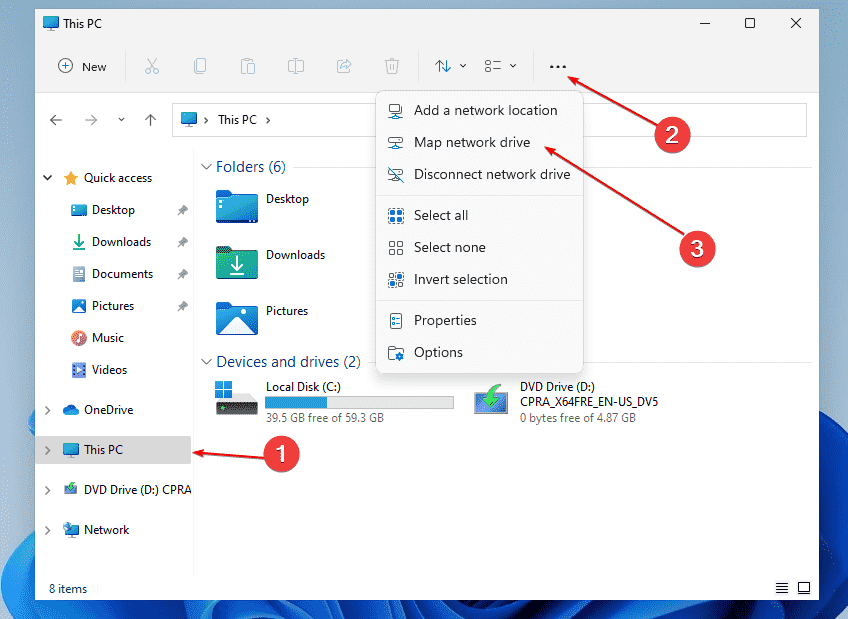
- Method 2: File Explorer: Open File Explorer, navigate to "This PC," right-click on "This PC," and select "Manage." Then, choose "Disk Management" from the left-hand pane.
2. Identifying and Selecting Drives
- Drive List: The Disk Management window displays a list of all connected drives, including internal and external drives.
- Disk Status: Each drive is represented by a disk number and labeled with its current status (e.g., "Online," "Healthy," "Unallocated").
- Partition Information: The window shows partitions on each drive, their size, file system, and drive letter assignments.
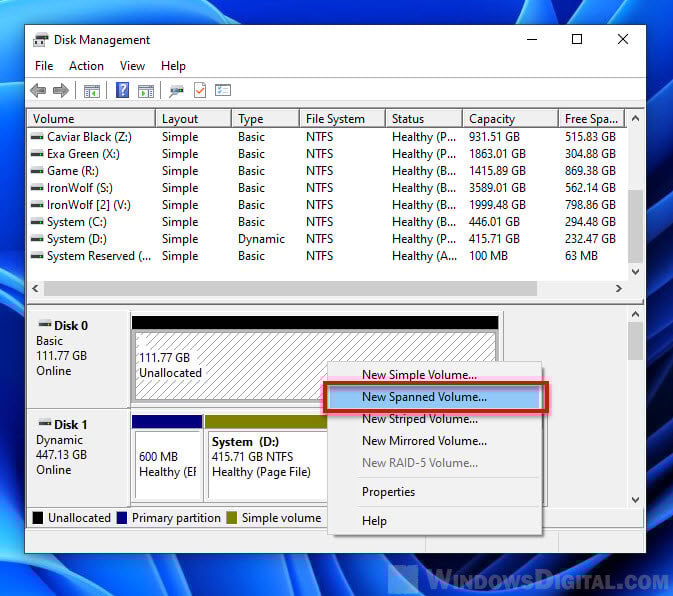
3. Creating New Partitions
- Unallocated Space: Locate the unallocated space on the drive you want to partition.
- Right-Click: Right-click on the unallocated space and select "New Simple Volume."
- Partition Wizard: Follow the wizard’s instructions to define the partition size, file system (e.g., NTFS, FAT32), and drive letter.
4. Formatting Drives
- Right-Click: Right-click on the newly created partition or an existing drive you want to format.
- Format Option: Select "Format…" from the context menu.
- Formatting Settings: Choose the desired file system (NTFS or FAT32), volume label (drive name), and other formatting options.
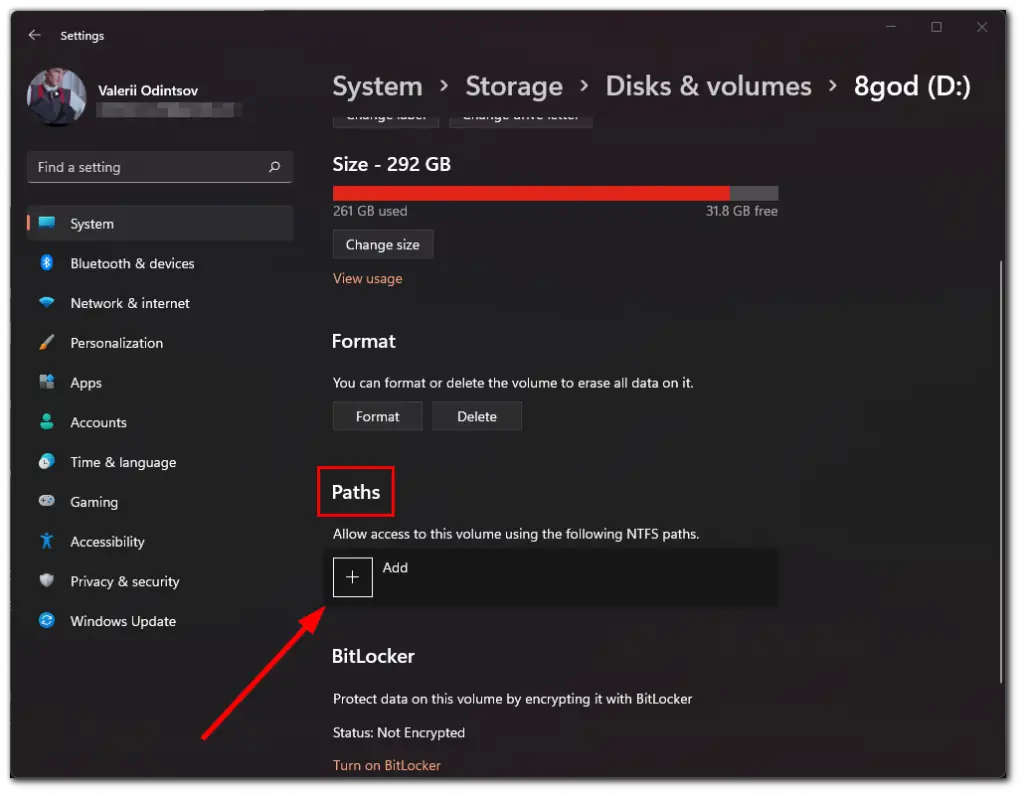
5. Assigning Drive Letters
- Right-Click: Right-click on the partition or drive you want to assign a letter to.
- Change Drive Letter: Select "Change Drive Letter and Paths…" from the context menu.
- Assign Letter: Click "Add," choose a new drive letter from the list, and click "OK."
6. Managing Drive Properties
- Right-Click: Right-click on the drive you want to manage.
- Properties: Select "Properties" from the context menu.
- Tabs: Access the "General," "Tools," and "Security" tabs to modify settings like drive label, error checking, and permissions.
Frequently Asked Questions (FAQs)
Q: What is the difference between NTFS and FAT32 file systems?
A: NTFS (New Technology File System) is the default file system for Windows 11 and offers advanced features like security, compression, and larger file size support. FAT32 (File Allocation Table 32) is an older file system with limited features, but it is compatible with a wider range of devices.
Q: How do I resize a partition?
A: Use the Disk Management utility to shrink or extend a partition by dragging the partition boundary. Ensure you have enough unallocated space on the drive to resize the partition.
Q: What happens if I delete a partition?
A: Deleting a partition permanently removes all data from that partition. Back up important data before deleting a partition.
Q: How do I recover data from a deleted partition?
A: Data recovery software can potentially recover deleted data, but success is not guaranteed.
Q: How can I improve drive performance?
A: Consider using a defragmentation tool for HDDs, enabling TRIM for SSDs, and managing drive space by deleting unnecessary files.
Tips for Drive Management in Windows 11
- Back Up Data: Regularly back up important data to prevent data loss in case of drive failure or accidental deletion.
- Monitor Drive Health: Use built-in tools or third-party software to monitor drive health and identify potential issues.
- Optimize Drive Settings: Adjust drive settings like power management and file system optimization for improved performance.
- Use Drive Encryption: Consider encrypting sensitive data on your drives for enhanced security.
- Seek Professional Help: If you encounter complex drive management issues, consult a professional for assistance.
Conclusion
Managing drives effectively is crucial for maintaining data integrity, optimizing performance, and ensuring the smooth operation of your Windows 11 system. By understanding the fundamental concepts, utilizing the Disk Management utility, and following the tips outlined in this guide, you can confidently configure and manage your drives, maximizing their potential for efficient data storage and access.
![How to Speed Up Windows 11 [2024 Tutorial With Pictures]](https://www.easeus.com/images/en/screenshot/partition-manager/defragment-and-optimize-drive-win11.png)

Closure
Thus, we hope this article has provided valuable insights into Setting Up Drives in Windows 11: A Comprehensive Guide. We thank you for taking the time to read this article. See you in our next article!