Navigating The Java Landscape: A Guide To JDK 8 On Windows 11
Navigating the Java Landscape: A Guide to JDK 8 on Windows 11
Related Articles: Navigating the Java Landscape: A Guide to JDK 8 on Windows 11
Introduction
With enthusiasm, let’s navigate through the intriguing topic related to Navigating the Java Landscape: A Guide to JDK 8 on Windows 11. Let’s weave interesting information and offer fresh perspectives to the readers.
Table of Content
Navigating the Java Landscape: A Guide to JDK 8 on Windows 11
The Java Development Kit (JDK) is the cornerstone of Java programming, providing the tools necessary to build, compile, and run Java applications. While newer versions of Java offer advanced features and performance enhancements, JDK 8 remains a widely used and supported version, particularly for legacy applications and systems that rely on its specific functionalities. This guide aims to provide a comprehensive understanding of JDK 8 on Windows 11, addressing its significance, installation process, and potential challenges.
Understanding JDK 8 and its Relevance
JDK 8, released in 2014, introduced several key features that revolutionized Java development, including:
- Lambda Expressions: These concise and powerful constructs allow developers to treat functions as objects, significantly improving code readability and reducing boilerplate code.
- Streams API: This powerful API enables developers to process collections of data in a declarative and efficient manner, leading to more concise and readable code.
- Date and Time API: The introduction of the java.time package brought a modern and comprehensive API for working with dates, times, and durations, replacing the older and less user-friendly Date and Calendar classes.
- Optional Class: This class effectively addresses the issue of null pointers, a common source of errors in Java applications. By encapsulating the potential absence of a value, the Optional class promotes safer and more robust code.
While newer JDK versions offer additional features and improvements, JDK 8 remains a popular choice for several reasons:
- Wide Compatibility: A vast ecosystem of libraries, frameworks, and applications relies on JDK 8, making it essential for maintaining compatibility with existing systems.
- Stability and Maturity: JDK 8 has undergone extensive testing and refinement, ensuring its stability and reliability in production environments.
- Long-Term Support (LTS): Oracle provides long-term support for JDK 8, offering security updates and bug fixes, ensuring its continued viability.
Downloading and Installing JDK 8 on Windows 11
Installing JDK 8 on Windows 11 requires a few steps:
-
Download the JDK 8 Installer:
- Visit the Oracle website and navigate to the Java SE downloads page.
- Locate the "Java SE Development Kit 8" section and choose the appropriate version for your operating system (Windows 11).
- Accept the license agreement and download the installer file (typically an .exe file).
-
Run the Installer:
- Double-click the downloaded installer file to launch the installation process.
- Follow the on-screen instructions, accepting the default settings unless you have specific requirements.
- During installation, ensure you select the option to add the JDK to your system’s PATH environment variable. This simplifies using Java commands from the command prompt.
-
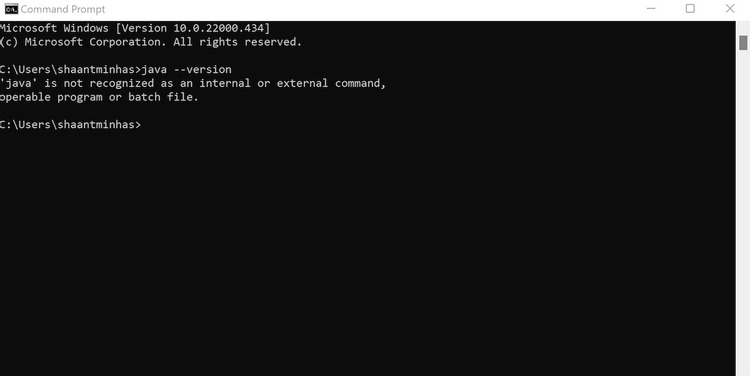
Verify Installation:
- Open a command prompt window and type
java -version. - If the installation was successful, you should see the JDK 8 version information displayed.
- Open a command prompt window and type
Setting up the Environment Variables
The PATH environment variable is crucial for executing Java commands from any directory on your system. During installation, the installer typically sets up the PATH variable automatically. However, if you encounter issues or prefer manual configuration, follow these steps:
-
Access System Properties:
- Press the Windows key and type "environment variables."
- Select "Edit the system environment variables" from the search results.
-
Edit the PATH Variable:
- In the System Properties window, click the "Environment Variables" button.
- In the "System variables" section, locate the "Path" variable and click "Edit."
- Click "New" and add the path to the JDK’s "bin" directory. This directory usually resides in the "Program Files" folder (e.g.,
C:Program FilesJavajdk1.8.0_341bin). - Click "OK" to save the changes.
Addressing Common Challenges
While installing JDK 8 is generally straightforward, certain issues might arise:
-
Java Version Conflicts: If you have multiple JDK versions installed, ensure you are using the correct version for your project. You can use the
java -versioncommand to verify the active JDK. - Environment Variable Issues: If the PATH variable is not set correctly, you might encounter errors when trying to run Java commands. Double-check the PATH variable configuration and ensure it includes the correct JDK directory.
- Firewall or Security Software Interference: Firewall or antivirus software might interfere with the installation process. Temporarily disabling these programs during installation can resolve this issue.
FAQs
-
Q: What is the difference between JDK and JRE?
- A: JDK (Java Development Kit) provides the tools for developing and compiling Java applications, while JRE (Java Runtime Environment) is a subset of the JDK that includes the Java Virtual Machine (JVM) and other necessary libraries for running Java applications.
-
Q: Is JDK 8 still supported?
- A: Oracle provides long-term support (LTS) for JDK 8, offering security updates and bug fixes until at least September 2026.
-
Q: Can I use JDK 8 on Windows 11?
- A: Yes, JDK 8 is compatible with Windows 11. However, newer versions of Java might offer better performance and security features.
-
Q: How do I choose the right JDK version for my project?
- A: Consider factors such as compatibility with existing libraries and frameworks, performance requirements, and long-term support. Newer JDK versions offer advancements but might require adjustments to existing code.
Tips
- Download JDK 8 from a trusted source: Always download JDK 8 from the official Oracle website to ensure you obtain a secure and reliable version.
- Set up a dedicated Java development environment: Consider using a virtual machine or a separate directory to isolate your Java development environment from other applications, reducing potential conflicts.
- Use an IDE (Integrated Development Environment): IDE’s like Eclipse, IntelliJ IDEA, and NetBeans provide a comprehensive development environment with features like code completion, debugging, and build tools, making Java development more efficient.
- Stay updated with the latest JDK releases: While JDK 8 remains widely used, newer versions offer improvements and security enhancements. Stay informed about the latest releases and consider upgrading if necessary.
Conclusion
JDK 8 remains a valuable tool for Java developers, particularly for maintaining compatibility with legacy applications and systems. Its extensive feature set and long-term support ensure its continued relevance in the Java ecosystem. By understanding the installation process, addressing potential challenges, and staying informed about the latest developments, developers can leverage JDK 8 effectively to build robust and reliable Java applications on Windows 11.


Closure
Thus, we hope this article has provided valuable insights into Navigating the Java Landscape: A Guide to JDK 8 on Windows 11. We appreciate your attention to our article. See you in our next article!