Creating A Bootable USB Drive For Windows 11: A Comprehensive Guide
Creating a Bootable USB Drive for Windows 11: A Comprehensive Guide
Related Articles: Creating a Bootable USB Drive for Windows 11: A Comprehensive Guide
Introduction
With enthusiasm, let’s navigate through the intriguing topic related to Creating a Bootable USB Drive for Windows 11: A Comprehensive Guide. Let’s weave interesting information and offer fresh perspectives to the readers.
Table of Content
Creating a Bootable USB Drive for Windows 11: A Comprehensive Guide
Creating a bootable USB drive containing Windows 11 is a crucial step for various scenarios, including:
- Clean Installation: A fresh start for your computer, resolving software conflicts and optimizing performance.
- Upgrading: Moving from an older version of Windows to Windows 11, while preserving essential data.
- Troubleshooting: Recovering from system errors or restoring a functional operating system.
- Dual Booting: Installing Windows 11 alongside another operating system, offering flexibility and choice.
This guide will provide a step-by-step walkthrough of the process, covering essential considerations and troubleshooting tips.
Understanding the Process
The process involves creating a bootable USB drive that essentially functions as a portable version of the Windows 11 installation media. This drive contains all the necessary files to install Windows 11 on your computer.
Prerequisites
Before embarking on the creation process, ensure you have the following:
- Windows 11 Installation Media: Obtain the official Windows 11 ISO file from Microsoft’s website. This file contains the necessary installation files.
- USB Drive: A USB flash drive with at least 8GB of storage space. Ensure the drive is formatted as FAT32.
- Computer: A computer with an internet connection to download the ISO file and a functioning USB port.
Step-by-Step Guide
Step 1: Download the Windows 11 ISO File
- Visit the Microsoft website: Access the official Microsoft website for Windows 11.
- Navigate to the download section: Look for the "Download Windows 11" or similar section.
- Select the correct edition: Choose the appropriate edition of Windows 11 (Home, Pro, etc.) based on your needs.
- Confirm your language and architecture: Verify that the chosen language and system architecture (32-bit or 64-bit) match your computer’s specifications.
- Download the ISO file: Click the download button to initiate the download of the Windows 11 ISO file.
Step 2: Prepare the USB Drive
- Back up important data: Before proceeding, back up any crucial data from the USB drive as the formatting process will erase all existing content.
- Format the USB drive: Connect the USB drive to your computer. Open "This PC" or "File Explorer" and locate the USB drive. Right-click on the drive and select "Format."
- Choose the correct file system: In the "Format" window, select "FAT32" as the file system. Ensure the "Quick Format" option is selected.
- Assign a label (optional): You can assign a descriptive label to the drive for easier identification.
- Initiate formatting: Click "Start" to begin the formatting process. This will erase all data on the drive.
Step 3: Create the Bootable USB Drive
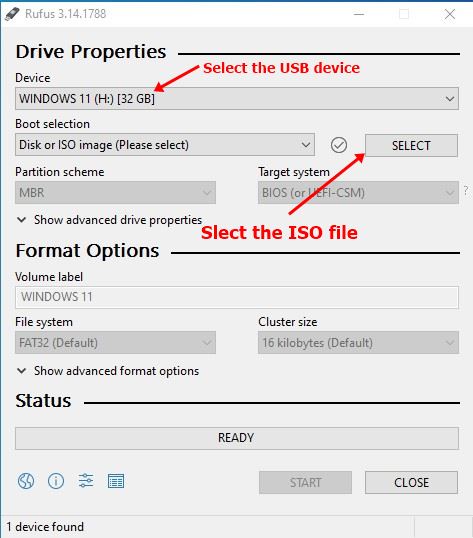
- Download a USB bootable tool: There are several free and reliable tools available for creating bootable USB drives. Popular options include Rufus, Universal USB Installer, and the Microsoft Media Creation Tool. Choose the tool that suits your preferences.
- Launch the tool: Run the downloaded tool on your computer.
- Select the ISO file: In the tool’s interface, navigate to the downloaded Windows 11 ISO file and select it.
- Choose the USB drive: Select the USB drive you formatted in Step 2 as the target drive for creating the bootable media.
- Start the creation process: Click "Create" or "Start" to initiate the process. The tool will copy the necessary files from the ISO file to the USB drive.
Step 4: Verify the Bootable USB Drive
- Restart your computer: Once the creation process completes, restart your computer.
- Enter the BIOS/UEFI settings: During the startup process, press the designated key (usually F2, F10, or Del) to enter the BIOS or UEFI settings.
- Select the boot order: Locate the "Boot Order" or "Boot Priority" settings within the BIOS/UEFI menu.
- Set the USB drive as the first boot device: Select the USB drive as the primary boot device. This ensures your computer boots from the USB drive instead of the hard drive.
- Save changes and exit: Save the changes to the BIOS/UEFI settings and exit. Your computer will restart, booting from the USB drive.
Step 5: Install Windows 11
- Follow the on-screen instructions: The Windows 11 setup process will begin automatically.
- Select your language and keyboard layout: Choose the preferred language and keyboard layout for your installation.
- Accept the license terms: Carefully read and accept the Windows 11 license agreement.
- Choose the installation type: Select "Custom: Install Windows only (advanced)" if you want to perform a clean installation. Otherwise, choose "Upgrade" to keep your existing files and settings.
- Partition the hard drive: If performing a clean installation, you will need to partition your hard drive. Allocate sufficient space for Windows 11 and any additional partitions you may need.
- Start the installation: After partitioning, the installation process will begin. This may take some time, depending on your computer’s hardware and the chosen installation type.
- Configure your settings: Once the installation is complete, you will be prompted to configure your Windows 11 settings, such as creating a user account, setting up Wi-Fi, and personalizing the system.
Frequently Asked Questions (FAQs)
Q: Can I use the same USB drive for multiple installations?
A: Yes, you can use the same USB drive to install Windows 11 on multiple computers. However, the process may require additional steps to ensure compatibility.
Q: What happens to my existing data during installation?
A: If you choose the "Upgrade" option, your existing data and settings will be preserved. However, a clean installation will erase all data on the target drive.
Q: What if the installation fails?
A: If the installation process fails, try troubleshooting common issues such as corrupted ISO files, insufficient disk space, or hardware incompatibility.
Q: Can I create a bootable USB drive without using a tool?
A: While possible, it requires advanced knowledge of command-line tools and file systems. Using a dedicated tool simplifies the process and reduces the risk of errors.
Tips for Success
- Use a reliable USB drive: Choose a high-quality USB drive from a reputable brand to ensure data integrity and prevent errors.
- Verify the ISO file’s integrity: Download the ISO file from a trusted source and verify its integrity using a checksum tool.
- Check your computer’s specifications: Ensure your computer meets the minimum system requirements for Windows 11.
- Back up your data: Before proceeding with installation, create a comprehensive backup of all important data to prevent data loss.
- Be patient: The creation process and installation process may take some time, depending on the size of the ISO file and your computer’s speed.
Conclusion
Creating a bootable USB drive for Windows 11 empowers you with flexibility and control over your computer’s operating system. By understanding the process and following the provided steps, you can confidently create a bootable USB drive, enabling clean installations, upgrades, troubleshooting, or dual booting scenarios. Remember to back up your data and exercise caution during the process, ensuring a smooth and successful experience.


![How to Make Windows 11 Bootable USB Drive [Step-by-Step Guide] - MiniTool Partition Wizard](https://www.partitionwizard.com/images/uploads/2021/07/windows-11-bootable-usb-drive-thumbnail.jpg)
Closure
Thus, we hope this article has provided valuable insights into Creating a Bootable USB Drive for Windows 11: A Comprehensive Guide. We thank you for taking the time to read this article. See you in our next article!